0x00 - start point:
in this article, we will cover "what is MBA Expressions" as the main topic. but while we are talking about this subject, we will also talk about techniques such as Opaque Predicates for a full understanding of everything. It might be a long post. so if you're determined to read, you'd better make your coffee before you start.
0x01 - introduction:
MBA Expressions, which stands for Mixed Boolean Arithmetic, is one of the most common principles used by many obfuscators. MBA Expressions are used to confuse the data flow of the program using boolean operators, (e.g., ∧,∨,¬,⊕) and integer arithmetic operators, (e.g + (ADD) , * (IMUL) , - (DEC) ) operators.
As shown in the picture above, a simple addition process in the first picture can be converted to a more complex and difficult MBA expression using arithmetic and bitwise operators. In other words, the main purpose of MBA expressions is to reduce the clarity of simple process patterns by turning them into more bloated and complex patterns.
We can make a simple introduction by rewriting the x+y equation, one of the most common MBA expressions.


x + y == (x ^ y) + 2 * (x & y)
here we rewrite the equation x+y, which is basically the sum of two unknown values, using arithmetic and boolean operators (x ^ y) + 2 * (x & y). and for every value you give to these two functions, the result of both functions will be equal. In other words, to explain in the basic obfuscation logic, these two equations are equal to each other. the only difference is that one is in its simplest form and the other is a bit more complicated using MBA expression.
0x02 - a little math:
in this part, we will use some math knowledge. then let's mix the above function a bit more. we have 1 function and 1 inverse function. these functions are affine functions. Unlike normal functions, affine functions rely on overflow.
Note: MBA expressions often use affine functions. basically the formula is f(e) = (a * e) + b. usually a,b are n-bit constants and e is our MBA subexpression.
Note: MBA expressions often use affine functions. basically the formula is f(e) = (a * e) + b. usually a,b are n-bit constants and e is our MBA subexpression.
our first expression: E₁ = (x+y) and our f(x) and f -1(x) functions (affine function):
(f: x -> 39x + 23 / f -1: x -> 151x + 111)
E₂ = (x ⊕ y) + 2 × (x ∧ y)

- in step 1, we wrote the E2 subexpression where we saw x in our f(x) function.
- in the 2nd and 3rd steps, we wrote the E2 expression where we saw x in the f -1(x) function, the same as the function we did above, and we got the E3 expression.
- we expand the E3 expression we obtained in step 4 and we come across an example obfuscated MBA expression.
mathematically these 3 functions are equal to each other and therefore they will give the same result. our basic principle here is to make the expressions more complex with bitwise and simple arithmetic operators.
0x03: a bit of "affine functions"
and if you've probably read another article before, you must have seen the same equation 39x + 23. Let's try to explain a bit where this equation comes from. (as much as my math knowledge)
f(x) = ax + b (mod 2ⁿ)
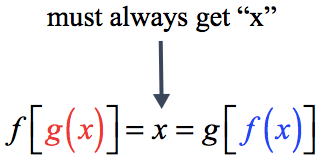
in order to use this function, we need a one more affine function ( g(x) = cx + d ). but these f and g functions we find must be inverses of each other. ie f(g(x)) function must be equal for each value of x.
so to summarize simply;
so to summarize simply;
f(x) = ax + b (mod 2ⁿ)
g(x) = cx + d (mod 2ⁿ)
f(g(x)) == x // for every x value
in simple math principles, if you write f(x) where you see x in an f -1 (inverse) function it should equal the same result as the function itself. f-1 (f(x)) = f(x)
to be sure of the existence of such a function, the coefficient a of f(x) must be prime between 2ⁿ. Considering this point, since we are using mod 2ⁿ, a must be an odd number for this function to be suitable for mod 2ⁿ.
here is the mathematical point where the 8-bit (2⁸) affine function (f: x -> 39x + 23 / f -1: x -> 151x + 111), which is used in all articles and we have also used :=)
before I get into MBA simplification, I would like to talk about a few more common techniques used with obfuscation. because most techniques are not usually used alone. A stronger structure can be obtained by blending many techniques with each other.
0x04 - Opaque Predicates:
as the name suggests, the opaque predicates technique is the technique of inflating the control flow by placing meaningless code blocks that will never work between the code blocks that the program will process during normal operation.

an example of a normal branching chart should look like this picture. the branches are significant and short. but when opaque predicate is used the control graph becomes horrible like this;

i hear your cursing. if we look a little closer, we will understand everything completely;

an example is an opaque predicate block. In this block, arithmetic operations are applied to two variables and at the end of the block, the equality of these two variables is checked. but since these two variables will never be equal, the code always branches in the same direction. Let's explain a little more clearly with images

it creates a code block that will never be interpreted by subjecting x and y variables to arithmetic operations such as multiplication, addition and subtraction step by step. this has no effect on code execution, because the code never branches to a different point. the purpose here is to make it harder for the reverse engineer to make sense of the control graph.


since we removed the subtraction of - 1, when 0 is given instead of x in both equations, the result will be equal to 0, so the two equations have a common solution model and the program returned the sat response from the check() function. By using the model() function, we have printed the model that provides us with these two equations.
(we made a small introduction to opaque predicate simplification. I will explain it in more detail in another article. for now, that's enough to know.)

we will need an SAT/SMT solver to confirm the correctness of this equation.
finally, let's show why this code block will not be interpreted with a simple python code and continue with MBA simplification.

Using the z3-solver module in python, we checked the equation model we obtained from the assembly code to see if this equation has any binary solution. and the program returned "unSAT" (unSATisfiable). If you get the answer unsat, it means that there is no model that solves the equation.
if there was any solution model, he would return the answer to sell to us. let's make our equation solvable and see the positive output.
if there was any solution model, he would return the answer to sell to us. let's make our equation solvable and see the positive output.

since we removed the subtraction of - 1, when 0 is given instead of x in both equations, the result will be equal to 0, so the two equations have a common solution model and the program returned the sat response from the check() function. By using the model() function, we have printed the model that provides us with these two equations.
(we made a small introduction to opaque predicate simplification. I will explain it in more detail in another article. for now, that's enough to know.)
0x05: MBA Simplification:
 |
| droidguard lib-*.so library graph view |
MBA expressions are frequently used in many popular applications, ransomware, application libraries today. The image I have attached above belongs to the lib-*.so library of the DroidGuard VM running in the core of Android. We can see a heavy use of MBA in the various functions in this library (the graph was getting longer, but I didn't reduce the image further for clarity :=] ).
in this article, we will use the mba_challenge file shared by Tim Blazytko.
in this article, we will use the mba_challenge file shared by Tim Blazytko.

we can see lots of XOR, AND and ADD instructions :=) let's prepare a python script using the miasm module and see the MBA expression of the block here.

output:
{((((((((RSI[0:32] ^ 0xFFFFFFFF) & RDX[0:32]) + RSI[0:32]) ^ 0xFFFFFFFF) & RDX[0:32]) + ((RSI[0:32] ^ 0xFFFFFFFF) & RDX[0:32]) + RSI[0:32]) & (RDX[0:32] ^ 0xFFFFFFFF)) + -(((((((RSI[0:32] ^ 0xFFFFFFFF) & RDX[0:32]) + RSI[0:32]) ^ 0xFFFFFFFF) & RDX[0:32]) + ((RSI[0:32] ^ 0xFFFFFFFF) & RDX[0:32]) + RSI[0:32]) | (((RSI[0:32] ^ 0xFFFFFFFF) & RDX[0:32]) + RSI[0:32])) + ({RDI[0:32] & ({RDI[0:32] & RSI[0:32] 0 32, 0x0 32 64} * 0x2 + {RDI[0:32] ^ RSI[0:32] 0 32, 0x0 32 64})[0:32] 0 32, 0x0 32 64} * 0x2 + {((((RSI[0:32] ^ 0xFFFFFFFF) & RDX[0:32]) + RSI[0:32]) & RSI[0:32]) + (((RDI + {(RDI[0:32] ^ 0xFFFFFFFF) | RDX[0:32] 0 32, 0x0 32 64} + 0x1)[0:32] ^ 0xFFFFFFFF) & RDX[0:32]) + (RDI[0:32] ^ ({RDI[0:32] & RSI[0:32] 0 32, 0x0 32 64} * 0x2 + {RDI[0:32] ^ RSI[0:32] 0 32, 0x0 32 64})[0:32]) + ((RDI[0:32] ^ 0xFFFFFFFF) | RDX[0:32]) + (RDI + RDX + 0x1)[0:32] 0 32, 0x0 32 64})[0:32]) * 0x2 0 32, 0x0 32 64}
calm down, we'll get over this soon. i will briefly talk about the code block so that the article does not go any further.

we generated a symbol table variable (loc_db) from the LocationDB class. we opened the mba_challenge file in a Container. then we derived a Machine() class and created a compatible type Machine by giving its architecture the architecture of our example file (mba_challenge).
after these definitions, we init a disassemble engine with the dis_engine function and set the start address of the disassemble function with dis_block.
then we create a new IR (Intermediate representation) variable using our lifter object that we created using our symbolic table variable. and with the help of add_asmblock_to_ircfg() function to this IR object, we give our IR variable (ira_cfg) and our variable containing the value of the code we disassembled at the target address. (asm_block)
then we derive an object from the SymbolicExecutionEngine class and with the help of this object, we execute a symbolically execute from the start address we have defined.
finally, since we want to obtain the expression, we return the data carried by the RAX register by giving the arch type of our lifter variable.
well, now that we've explained the code, let's simplify this expression a bit.

output:
{(((RDI[0:32] + RSI[0:32]) << 0x1) + RDX[0:32]) * 0x2 0 32, 0x0 32 64}
it's a little less scary now :=)
here we have implemented a simplification using the Simplifier class of the Msynth code deobfuscation framework. we've found the little expression where the huge long expression we've just seen is actually equal :=)
basically, the MBA technique works on the same principle on the code as we explained above with mathematical functions. Just as we make a simple x+y equation very complex with mathematical methods, when we apply similar principles on the code side, we come across mixed MBA expressions.
there are many tools available (Qsynth, Msynth etc..) to simplify MBA expressions, but I used msynth in this article as it was the most satisfying to me in terms of performance and results.
All materials used in the article can be found at https://github.com/Ahmeth4n/ahmeth4n.github.io/tree/master/materials/mba address. i hope it was a useful article :=). see you later.
All materials used in the article can be found at https://github.com/Ahmeth4n/ahmeth4n.github.io/tree/master/materials/mba address. i hope it was a useful article :=). see you later.
thanks for:
Tim Blayztko - https://www.youtube.com/watch?v=_TsV0RXoIQE
Tim Blayztko - https://www.youtube.com/watch?v=_TsV0RXoIQE


